
Introduction
My interest in fiberglass started in college. I took every composites oriented class that was available. During the summer, I worked for the local boat building shop. Later on, I met the Lynchs, Gary Sr. and Gary Jr. They were the owners of Lynchs Fiberglass Fabrication, located in Lake Havasu City, Arizona. No one has taught me more about the practical aspects of fiberglassing than the Lynchs.
I'm sure there is more than one successful way to approach plug and mold building. The process I am presenting has developed over time with a lot of failures along the way. It is a very robust approach, with a high probability of success.
The Plug
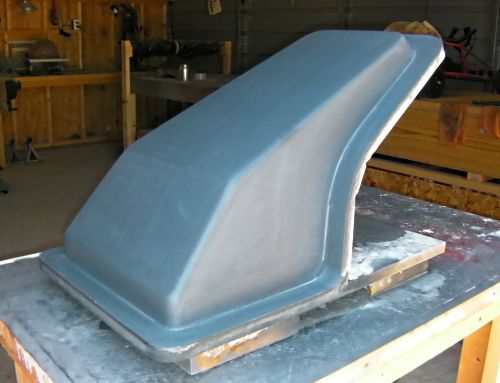
The plug is an exact model of the finished product. The mold is made off of the plug. Often, the plug is damaged when the mold is pulled. Once I have pulled a good part from the mold, I throw the plug away.
There are several features that you should try to avoid when designing a shape to make out of fiberglass. The first one is a large, flat surface. Fiberglass is quite flexible, and big, flat surfaces will "oil-can" back and forth unless they are very thick. All the surface needs is a big, simple curve to it or an edge running through it. This rule holds true for sheet metal too; look at car hoods.
The second feature to avoid is sharp corners. It is very hard to keep glass sticking tightly to sharp corners during lamination. The glass will tend to pull away during curing and leave bubbles in the fiberglass, which weakens the gel coat. I try to avoid radii smaller than one half inch.
The third feature applies to one-piece molds. There should be a positive draft angle of five degrees minimum on all side surfaces. It makes pulling the parts a lot easier. If you have negative surfaces in your design, like the lip on a car's wheel well that curves back in, you will need to make a break-apart mold. I'm not going to deal with them in this guide. I don't like them. I would rather go back and figure out a different design approach that allows me to use one-piece molds only.
Each fiberglass step shrinks a little. The mold is a little smaller than the plug, and the part is a little smaller than the mold. The laminate shrinks during curing. A good rule of thumb is about a 1% reduction in size between the plug and part. If you want a 12" finished dimension on a part you should make the plug about 12-1/8". I try to never design parts with a tolerance so close that shrinkage matters.
If you are making both pieces of a tight-fit assembly out of fiberglass, there is no problem. The parts will shrink at the same rate. Making a tight-fit when one part is fiberglass and the other part already exists is when it gets kind of tricky.
A kit car company I know decided to use a production steel door in their kit. They used the actual steel frame off of the production car in their plug. Cool idea, but they should have lengthened the frame a bit because when the first production fiberglass body was finished, the door opening was too small for the steel production door to fit in.
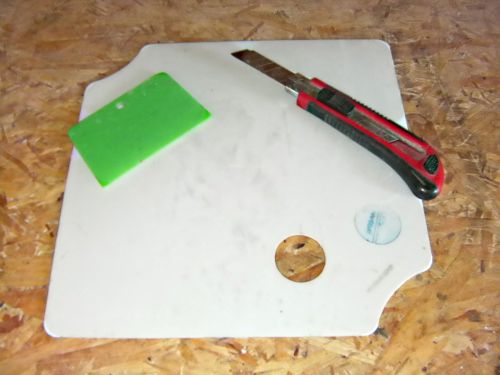
Plugs can be made out of just about anything that hardens. Most pattern makers use wood, plywood, chicken wire with plaster, auto body putty, etc. I like to use MDF and polyester body putty. These two building materials sand away at about the same rate so it is easy to blend them. If you need simple curves, cut parallel lines almost all the way through on the back side of the MDF and it will curve a little. If there are compound or tight curves, I use polyester body putty. Some pattern makers will use plaster on big curves because it sands away so easily.
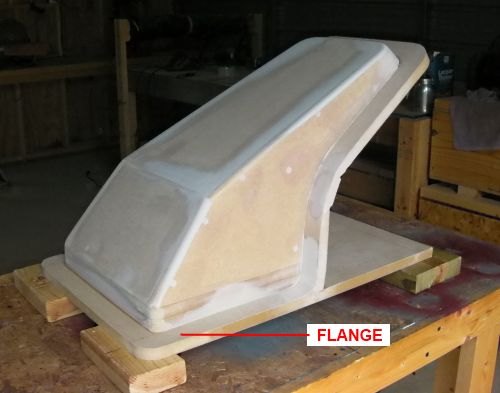
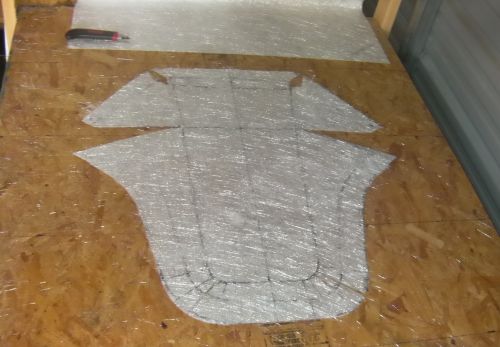
After the plug shape is finished and sanded, I add a flange all the way around the plug. The flange makes the mold straighter and stiffer. It also gives you a good edge to help mark the edge of the finished part for trimming. I know this breaks my rule about sharp corners, but I use it only on molds and the production parts will end at the corner.
I have some hints if you are going to use polyester body putty. Buy yourself a mixing board, spreader and a packing knife with a blade that can extend a long way. Stir the putty in the can before using. Mix up some putty and hardener on the board, using the spreader to mix. Apply the putty evenly. Don't try to get final coverage in one coat; putty sags.
As soon as the putty begins to get bumpy during spreading, stop. "Just one more wipe" will not work. Take the spreader and scrape off the mixing board. Set the messy spreader aside. Wipe the board clean with laquer thinner. Now peel the semi-hardened putty off of the spreader (sometimes the packing knife can help), and then clean the spreader with laquer thinner.
When the putty is in a warm, jello-like state, you can cut it very easily with the extended blade of the packing knife. I do almost all of my major forming with the packing knife blade. Be careful because it is easy to dig into the putty farther than you mean to when it is still in this semi-hard state.
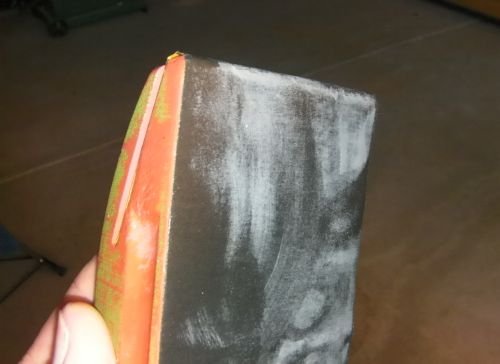
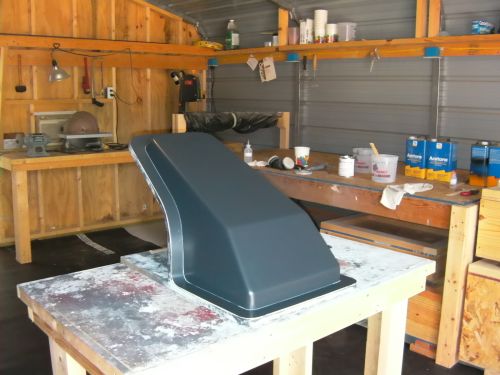
The next thing to do is seal the plug so the texture of the building materials wont get into the mold. There is only one product that I use for sealing: Duratec polyester surfacing primer (www.duratec1.com). I like 707-002. It is dark gray and pretty hard. They have some light gray and tan colored coatings that build up thicker and sand easier. I have heard they are nice, but I have not used them.
The primer is two part, so you need to move once it is mixed up. Duratec says to thin the primer with acetone if needed to aid spraying. I was taught to use laquer thinner, and have never had bad luck using it. I thin the base primer to a car paint like thickness, and then add the catalyst. You can clean your gun after spraying using laquer thinner. Just don't let the primer go off in your spray gun.
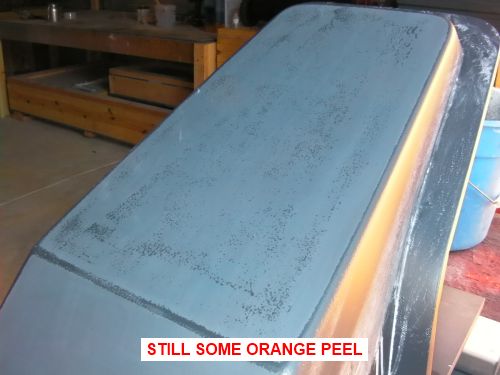
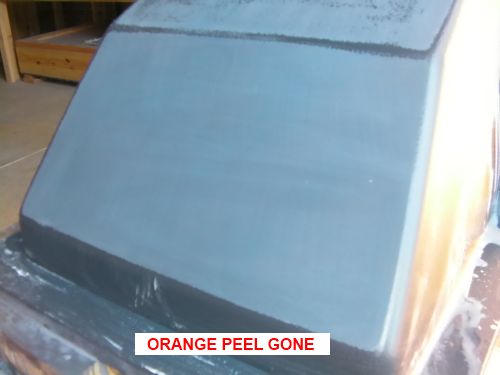
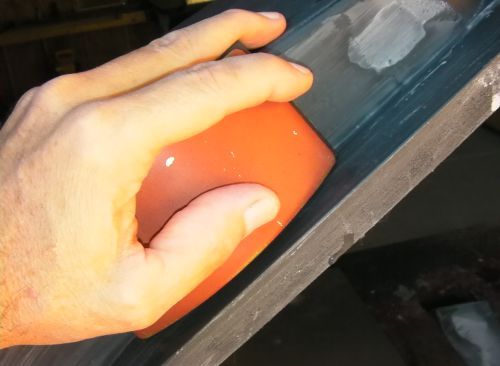
Once the primer has cured, wet sand it with 400 grit paper on a rubber sanding pad. The primer orange peels a bit, which I like. When the orange peel is gone, I stop sanding. Putting a couple of drops of dish washing soap into the sanding water helps the paper to not stick on the primer during sanding.
I like to mount the sandpaper on the rubber pad with one side of the paper flush or recessed a little. It allows me to sand right into a corner without digging into the adjacent surface.
When sanding is done, wet the plug and look at reflections in the wet surface. If there are surface irregularities, the reflections will show them.
When the plug is dry, it will have a nice, uniform, matte finish. Some people recommend that you sand a plug all the way to 2000 grit. I strongly suggest that you do not do this. You can get your super nice finish by working the mold after it is pulled. The problem with a super slippery plug is that the mold's gel coat might pre-release.
Pre-release happens when the gel coat pulls loose from the plug during mold lamination build-up. You will never know it until you pull the finished mold off and the surface of the mold is all wavy. You might as well throw the mold away and start over. I hope the plug didn't fall apart when you pulled the mold. Get the idea? This is a really bad failure. Leave the plug with a frosty finish and polish the mold later.
The next step is to wax the plug ten times (yes ... ten). When you are done, the plug will almost look like it is wet again. I use "Hi Low" mold release wax made by Finish Kare, part number 1000 (www.finishkare.com). I'm sure there are other good waxes out there, but I know this one works. Buff each layer by hand using clean cotton rags. Never use a power buffer. Even with ten coats, the wax layer is extremely thin (about 0.002). A power buffer can burn right through the wax.
The Mold
Notice the black floor. I use 30lb roofing felt for a floor cover. Even when your feet get sticky, the felt just lies there. I used plastic drop cloths once. By the time I was done spraying gelcoat on a fairly big mold, I had giant round balls of plastic wrapped around each foot. Really a mess that day.
The stuff you are getting ready to spray is nasty. Get prepared. Wear long pants and a hooded sweatshirt. Cured gelcoat makespretty good hair mousse, but I hope you like the hair style because you will never get it out. Wear a good respirator, cover your eyes and wear disposable latex gloves.
Some people try to apply gelcoat with a brush. I have never seen it work. ES Manufacturing makes a cheap gelcoat gun. You can buy it from www.uscomposites.com. That's what I use. Stay back about two to three feet when spraying. If you get too close, the air from the gun will push the gelcoat into ridges.
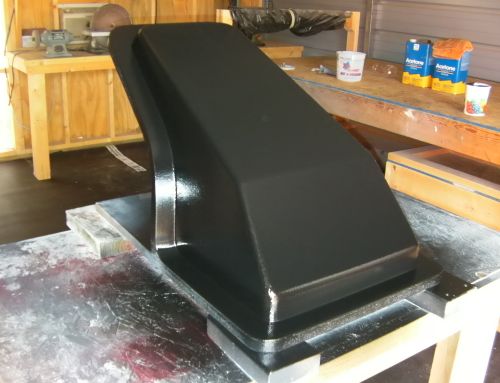
Use tooling gelcoat on molds. It is tougher than regular gelcoat and can stand up to the tugging and flexing that a mold goes through during use. Normally, there are two colors available for tooling gelcoat, black and orange. Pick the color that you will not be using on a finished part. The idea is to help with contrast during part gelcoat spraying so you can see when you have an even layer of gelcoat sprayed into the mold.
I use black because I will probably never make a black finished part. Black shows every imperfection and fiberglass products tend to have a little wave and cloth pattern in them no matter how careful you are.
Let the gelcoat cure overnight. It will remain a little sticky on the outside even after it is cured. This is good because it lets the laminates bond well with the gelcoat. If there is an area of gelcoat that is thin (like what a brush can do), laminating resin can eat through the gelcoat and make it pucker. You will only find this out once the mold is finished and pulled. It is called "alligatoring".
After the gelcoat has cured overnight, look it over very carefully for any bumps that stick out, like a drip of gel coat, or a bug that might have wandered in. It is important that there are no air bubbles in a lamination. It is especially important that there are no air bubbles between the gelcoat and the first layer of fiberglass. If there are, the mold's gelcoat will break off or crack at the point of the bubble when the mold is used.
Bumps on the gelcoat tend to create bubbles by holding the fiberglass off the surface like a little tent pole. Using very light pressure, sand away bumps using 80 grit paper. Leaving a little bit of the bump is better than sanding in too far. Lightly blow the sanding dust off the gelcoat. Do not use an airgun at close range. The air pressure can easily lift the gelcoat right off the plug. Do not wipe the gelcoat with solvent. Leaving a little dust is OK.
Molds should be built using isophthalic polyester tooling resin. This resin is tough, flexible, and does not get very hot during curing. It will make a mold that will last a long time, and not warp or shrink too much during curing. It also cures slowly so you will have extra time to work with the resin when it is catalyzed.
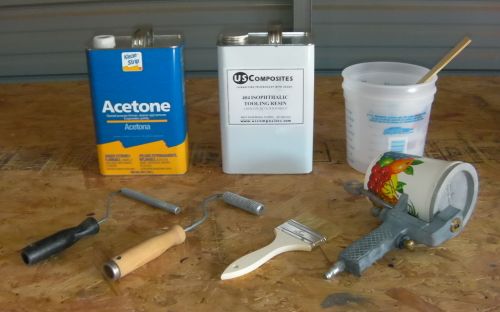
Here is a picture of some of the equipment I use during fiberlassing. Resin, acetone, wetting out rollers, natural bristle brush (cheap throw away), mixing bucket, stir sticks, and a gelcoat gun. I always put some acetone in an open bucket before I start. If resin starts to harden, you will want to clean your roller quickly. Acetone, waiting in a bucket, has saved many a roller for me.
Fiberglass is strong and flexible. The resin is strong and brittle. A good laminate uses as little resin as possible. Don't cheat yourself on resin, though. Fiberglass that has not been fully saturated with resin is worse than too much resin. Fully saturated fiberglass will turn from white to clear. A good laminate will be fully saturated, but will still show the fiberglass texture on the surface. A laminate with too much resin will be smooth and shiny on the surface.
The first layer of laminate on the mold is called the "whisker coat". The purpose of this layer is to get one bubble-free layer bonded to the gelcoat. I use 1-1/2 oz mat for the whisker coat. Some people use thinner mat for this coat. I don't like the way thinner mat wets out (saturates with resin). Cut the mat while it is lying flat on a piece of plywood. Use a packing knife. There are scissors available, too. I don't like them because it is hard for me to cut straight with them.
Cut the mat to size and set it aside. Mix up some resin and brush a light coat onto the gelcoat. This will help wet out the mat from the bottom side. Put the dry mat in place and wet it from the outside with more resin. Work all of the bubbles out of the laminate by tapping repeatedly with the tip of the brush, moving the bubbles to the edge of the buildup.
I try not to use a roller for the first layer. The roller can leave parallel marks that will show throught to the finished side of the mold. If you do need to use the roller, push lightly. You can tell when the mat is fully wetted out because the white color of the mat will turn clear. Make sure you use a natural bristle brush. Synthetic bristles can melt when the resin gets on them.
Even after you have worked out all of the bubbles, new ones can form when the resin is still runny, especially on vertical surfaces and edges. The resin will try and drain out and puddle in low corners. Use the brush to soak up excess in the corners and rewet areas that are trying to drain.
Stay with the mold until this layer cures. The resin in the bucket will cure more quickly than the laminate because of its thickness. To test laminate curing, press down very lightly on the excess material sticking off of the edge of the mold. When it springs back, it is cured enough that you do not need to watch it anymore. Always test by pushing down towards the mold, if you lift the edge to test, it might not go back down.
To deal with the sharp edge of the flange, put the first whisker coat on the flange only. Make sure the glass is firmly pushed into the sharp corner but don't try and go around the corner. After the first layer has cured, lightly go over the laminate with 80 grit sand paper and remove any stray glass fibers that are sticking out.
The second layer should go on the flange as before, but put two layers of 1-1/2 oz mat on, this time. With these two layers you can begin to radius the laminate in the sharp corner just a bit. It's ok to use the roller on this layer, but use the brush in the corner.
Now that the flange has three layers, we can move on to the body of the mold. Precutting the mat for the whisker coat is a little different than for the flange. Each surface on the mold should have its own precut piece of mat. The edge of the mat that touches the flange should be cut to have a good fit against the flange. The other edges of the mat should be torn. Torn edges will stay down more easily around edges when you wet the mat out.
Using torn edges on subsequent layers is a good idea, but it is really messy and time-consuming. Cut edges are ok after the whisker coat. Cut mat should never end right at a corner. It will be almost impossible to keep down. Cut the edges so it goes around the corner for about one inch.
After the whisker coat has cured, it's a good idea to check for the dreaded pre-release. Use your finger and tap the surfaces of the mold. If the gelcoat has pulled loose from the plug you will be to able to tell, both by feel, and by a hollow sound. If there is any pre-release, I would pull the mold, rewax the plug, and start again. Flat surfaces (like I tend to use) pre-release more easily than curved surfaces.
Apply the next two layers at the same time, just like on the flange. Try and keep layer buildup at an even thickness. Sometimes it is easy to get a buildup in corners that is many layers thicker than the rest of the buildup. These extra-thick areas will get very hot during curing. Often, these hot areas in corners will pull away from the laminate and leave big voids.
At this point you have a good, solid start on the mold. If a couple of bubbles get into subsequent layers, it's no big deal, but still try to avoid them.
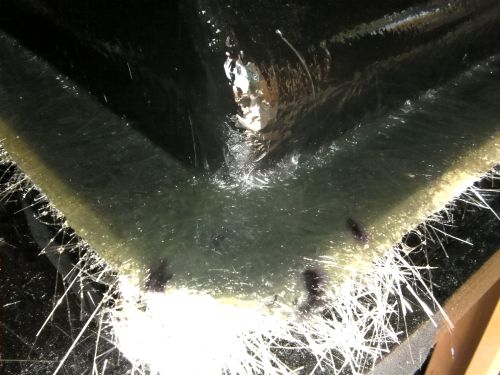
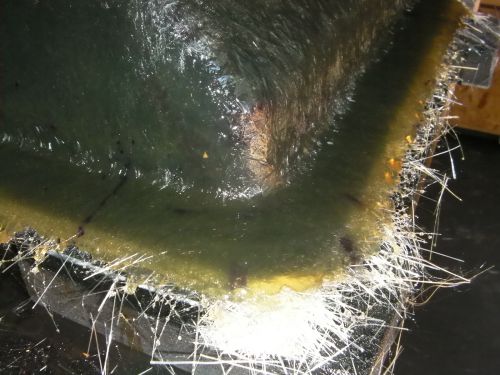
On this mold, I think the corner at the flange is still a bit sharp so I'm going to put a couple more layers of mat on the flange with a torn inner edge so I can round out the corner.

Here is a close-up of the corner after rounding it a bit more. I want the corners rounded to help the build-up layers go on more easily.
On the buildup layers, on a mold this size, I will precut the mat so one sheet of mat will fold down and completely cover the mold with no overlaps. I try and avoid overlaps because, if you are putting down three layers at a time, any overlap will be six layers thick. A local six layer buildup will get a lot hotter than the adjacent three layer buildup. Sometimes these hot areas will actually show through the mold and be visible on the finished part, or lift during curing and form a bubble.
When you are applying more than one layer of mat at a time, there are two methods I know to get the mat wetted out. I have tried them both. I tend to use the first. The method that does not work is to put down three dry layers of mat and try and saturate them all from the top.
Method one : Brush resin onto the surface of the mold, put on one layer of mat, brush resin onto the mat, put on the second layer of mat, brush on resin, put on the third layer of mat, and brush on resin. Now take the roller and work out the bubbles. Start rolling at the center of the mat and pull the bubbles towards the edges. If you did not brush on enough resin during this layering process, it will be almost impossible to fully wet out the laminate. If you applied excess resin, it will move to the edge of the laminate as you roll out the bubbles and just drip off the mold.
Method two : You will need a large flat board for this process. Place one layer of mat on the board, brush on resin, lay down a second layer, brush on resin, lay down a third layer, and brush on resin. Pick up the whole wet laminate and put it in place and roll out the bubbles. Mat is held together by a soluble binder. When it gets wet with resin, the binder begins to dissolve. If you let the wet laminate lie on the board too long, it will fall apart when you pick it up. That's why I leave the first layer dry on the board side. It helps keep the mat together when you pick it up.
You have to put the mat on the board backwards. The top layer of wet mat is the layer that should be put against the mold. After you are done, make sure you brush out the board flat so it can be used again. The benefit to method two is that you can wet the mat out quickly because it is lying flat. In fact, you can pour the resin and spread it with a squeegy. This method works well in production on small parts, with two people laminating. One person wets the mat and maintains the board. The other person applies the mat and rolls it out.
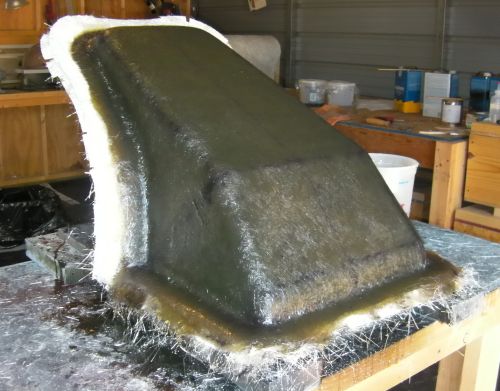
Mold build up from now on is up to the individual builder. Some people use foam core, or x-glass, or woven roving, etc. The idea is to build up a stiff strong laminate about 3/8 to 1/2 inch thick for small molds, thicker for bigger molds. I have seen boat hull molds that are 1-1/2 inches thick. For small molds, I just use 1-1/2 oz mat. I build it up three layers at a time until there are twelve layers total on the mold. This ends up being about 3/8 inch thick, which is good enough for a small mold.
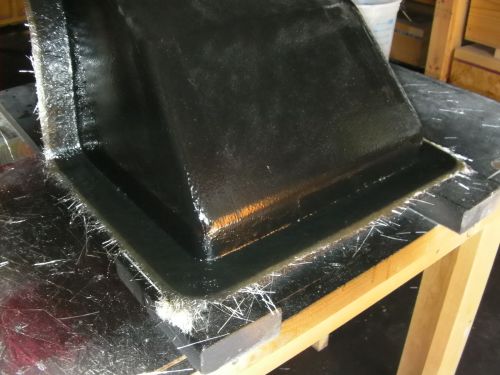
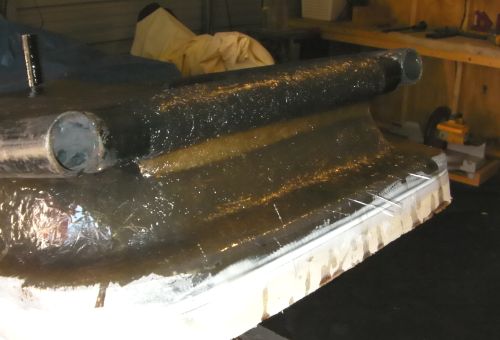
Here is the finished mold with twelve layers. I used the pattern I cut at the beginning as my last layer. The pattern had black marker lines on it. That's why you see black in the mold.
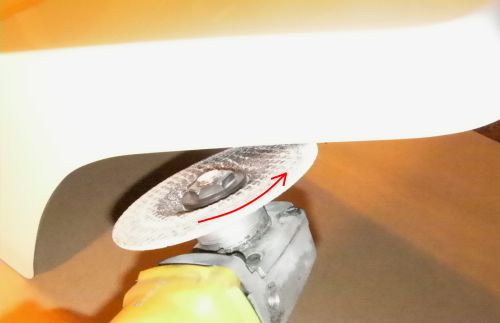
The next step is messy. The flange needs to be trimmed. I use a right-angle grinder and a carbide cut-off wheel. The grinding dust is bad for your lungs and it itches like mad. Wear a hooded sweatshirt, long pants, socks and shoes, rubber gloves, and a dust mask. I tape the sleeves of my sweatshirt to the gloves, using masking tape.
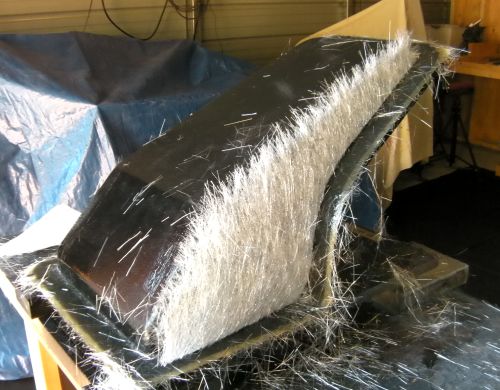
Cut the edge of laminate away until you get to the plug. Sometimes the mold will pop loose during this process. This mold did. You can tell by the gap between the plug and mold. It's tempting to pull the mold off at this point, but don't. You will never get it to fit back on the plug because it has shrunk a little, and it needs to be resting solidly on the mold for the next process.
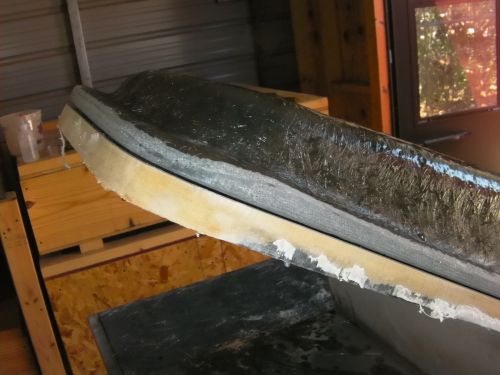
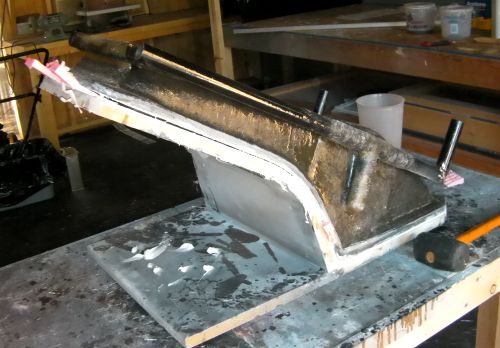
Once the rough edges are cut away, you will have a good view of the thickness of your mold. If you want it thicker, now is the time. There also needs to be some structure glassed onto the back of the mold. If the mold popped loose during trimming, the gap needs to be sealed before doing any more glasswork. This will keep resin from leaking into the crack and getting onto the finished mold surface. I use the cheapest latex caulk I can find.
The structure on the back of the mold does a couple of things. First, it gives stable legs to the mold so the mold won't rock around when you are making parts. Second, it helps hold the mold in shape after it has been pulled from the plug. Fiberglass can creep and sag over time. This is especially true if the mold ever gets hotter than it was when it was made.
I use round steel bars for the support. Steel because it is stiff, durable, and can be welded. Round because glass will stay on a round bar better than on a square bar. Design the structure so it runs along edges rather than across big flat areas. If you are not careful, you can still locally distort the mold when glassing on the structure.

Attach the frame to the mold using fiberglass and resin. You don't need to attach the frame everywhere. I use three layers of mat cut into four inch by seven inch rectangles, and apply them about every ten inches. The frame should be spaced off of the mold about 1/4" before glassing. I use pieces of stir sticks, which are removed after the fiberglass has cured. As the attachment pads cure, they will shrink a bit. The spacers keep the metal frame from being pulled tightly against the mold, causing distortions.
Remember when I said earlier not to pull the mold off of the plug yet? Here are the reasons. If you pull a flexible mold and then glass on the frame, there will be a good chance that the mold will be twisted when the frame is glassed on, and you will end up with a nice, stiff, twisted mold. Also, the frame is needed on bigger molds to make the mold stronger so it won't crack during the mold/plug separation. You will see very soon that this can be a rather violent process.
Go back over the edge and clean it up if there is any new glass sticking off from when the frame was attached. I also like to run over the entire back side of the mold lightly with 80 grit sandpaper. There are usually some little resin-hardened glass barbs sticking out that can cause a fair amount of pain if not dealt with.
Now it's time to pull the mold. Sometimes this requires nerves of steel because it won't come off at first. Be patient; don't panic. It will come off. Fiberglass supply companies like www.uscomposites.com carry soft plastic wedges designed to help separate molds from plugs without scratching the mold's surface.
You will need a crack between the mold and plug to start the wedge. If you can't find one, you will need to make one with a screwdriver or chisel. Try to dig the screwdriver into the plug when making the crack. Once you have the crack big enough to start the plastic wedge, you're in good shape.
You will need to put in quite a few wedges. This mold required four before it released. Work from one end. Once the wedges are in place you can smack the big surfaces of the mold with a rubber mallet. Never use a steel hammer. I go back and forth between smacking the mold and driving the wedges in a little farther. Sometimes the best thing to do is walk away for a little while.
I was working for a boat company one summer. We built a new hull mold. It was a small shop and the owner had his company's future tied up in the mold. It stuck. We did every trick he knew. We had the entire mold and plug hanging about six inches off the ground from an overhead crane. Hours of effort went by to no avail. I could tell the owner was beginning to panic when he suddenly did the most surprising thing. He stopped and said, "Let's go to lunch".
We took a two hour lunch and by the time we got back, he was calm and rational. He walked up to the mold and said, "This one has sure got me beat", and then he kicked it lightly. Kabam ... down it fell. We looked over the mold and it was in perfect shape.
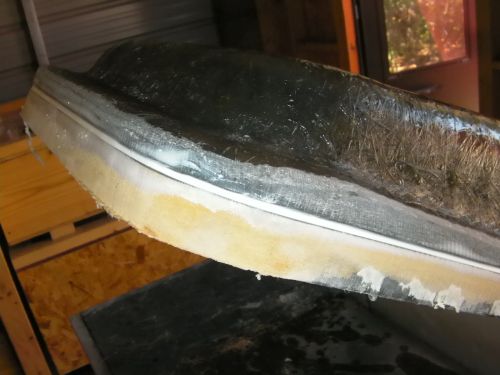
Back to the fender mold. It popped off after about ten minutes of work. The outer edge of the flange is like a razor at this point. Chamfer it using 80 grit sandpaper. The entire surface of the mold should now be wet sanded with 1000 grit sandpaper. There were probably little pin holes in the surface of the plug, and if there were, they will show up as little bumps in the mold. Sand the entire gelcoat surface of the mold with 1000 grit. I was told this helps release any trapped solvents in the gelcoat.
After sanding, polish the mold. I like 3M Super Duty Rubbing Compound, P/N 05954. You can get it at any autobody paint supply store. Some people go on with finer polishes until the mold sparkles. I don't. The 3M compound gives me a good enough shine for what I want. If I want a perfect part, I would rather go back and buff the part.
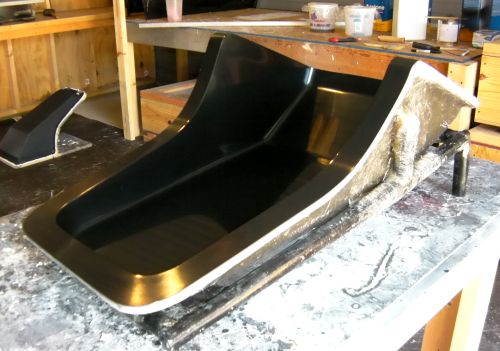
Let the mold sit for a day, and then wax it with ten coats of mold release wax, just like you did with the plug. After the tenth coat of wax is buffed off (by hand), the mold is ready to use.
The Part
Tape off the flange with masking tape. It helps during cleanup. Spray on an even layer of gelcoat. Stay back from the mold about two feet when spraying. It helps keep ridges from forming in the gelcoat. The gelcoat in a production part does not need to be super thick. In fact, if it gets too thick it will chip off more easily. About a 1/16" thickness is good. I used one pint of white gelcoat on this part.
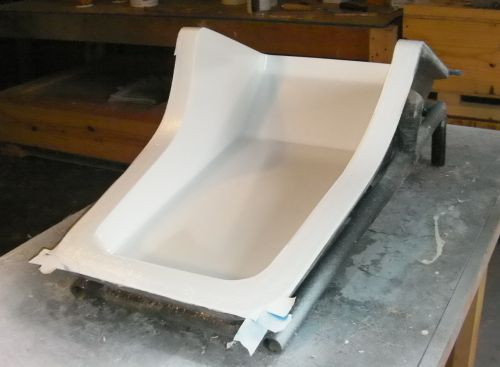
After the white has cured completely, I will go back and spray on a very light coat of black gelcoat. The black keeps light from shining through the part and it helps you see bubbles during layup.
Layup a whisker coat using one layer of 1-1/2 oz mat. After the whisker coat has cured, put on the additional layers of laminate using the glass materials that are appropriate for the type of use the part will go through. This fender will not go through any particular stress during its life so I will make it out of a total of three layers of 1-1/2 oz mat. I will also add two more local layers of mat at the points where the fender will be attached.
Removing the part from the mold is the same process as removing the mold from the plug. Usually the parts are thinner and more flexible than the mold, which helps with removal. Peel the tape on the flange loose, peeling from the outer edge of the flange to the inner edge. Put your thumbs under the tape and press the edge of the part in, pushing it away from the mold. I did this at four points around the part. and it popped right out. On thicker parts you may need to use the soft plastic wedges. The first part usually sticks the most. After you have pulled around five parts, the mold will be "seasoned" and parts will come out more easily.
After the part has come out, it is time to clean up the edge. I use a right angle grinder with a metal-cutting carbide disk to rough the part into shape. It is super easy to tell how far to grind because the gelcoat ends right where the part ends. After roughing the part's edge into shape, I use 80 grit paper on a sanding block to do the final cleanup. When using the right angle grinder, make sure to cut with the side of the wheel that is moving into the part. If you cut with the side moving out of the part, the gelcoat will chip off.
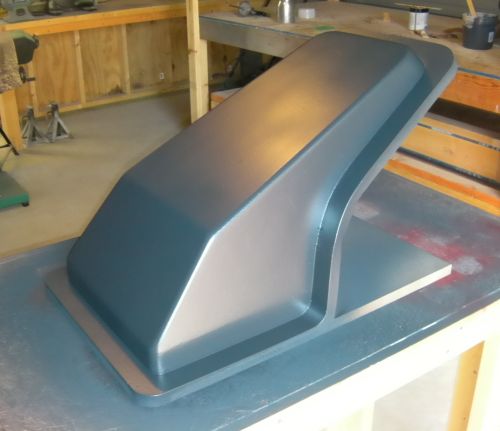
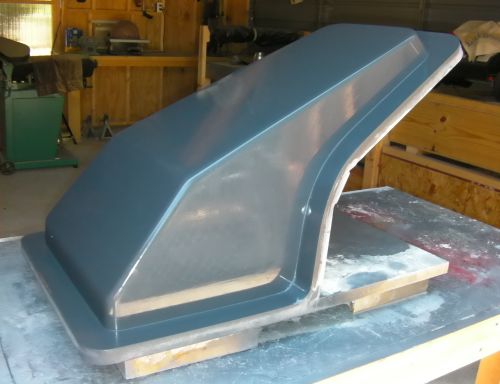
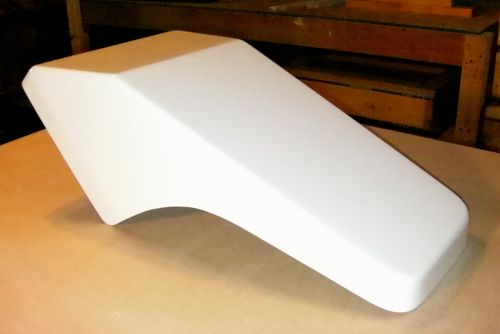
Well, that's it. Here is a picture of the finished part. I'm not fond of raw, sanded edges, so I will put a piece of push-on plastic trim on the visible edges before the fender goes into the car.
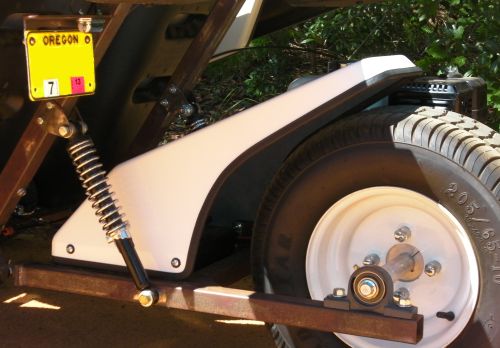
Here is a picture of the fender in place on the Sceadu. The Sceadu's frame is not yet painted.
Summary
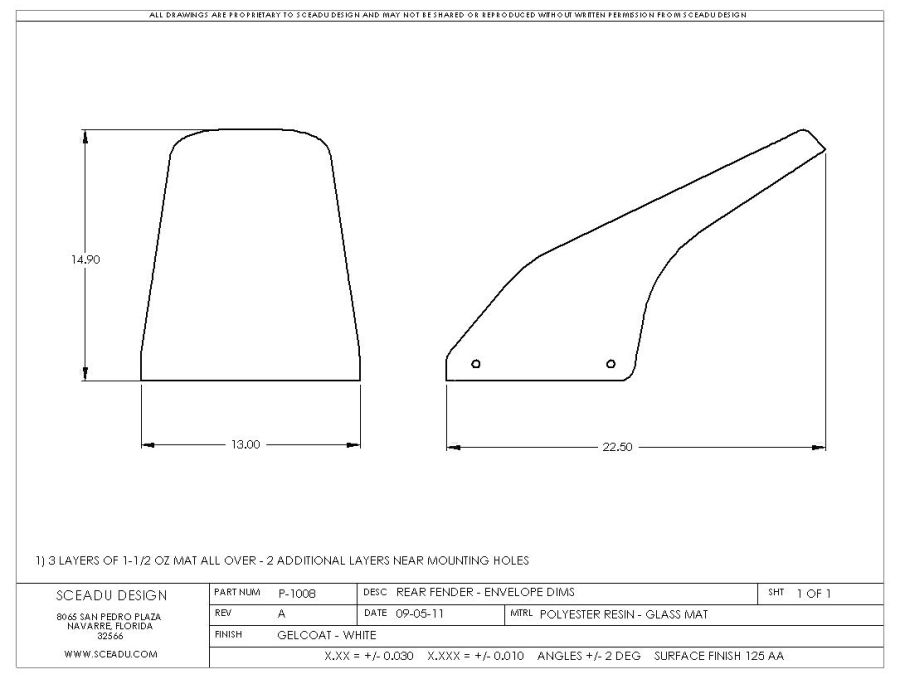
I thought I would summarize the quantities of materials used on this project. Here is a picture of the part with dimensions so you can get a feeling for it's actual size.
Resin -
A total of 3 gallons for the mold and one part.
The mold took 2-1/2 gallons.
The part took 1-1/2 quarts.
During mold layup, it took 1-1/2 quarts of resin for each three layer buildup.
Mat -
A total of 40 feet for the mold and one part (mat was 38" wide).
Duratek Primer -
1 quart for the plug.
Black Tooling Gelcoat -
1 quart for the mold.
White Gelcoat -
1/2 quart for the part.
Acetone -
3/4 gallon total,
To conserve acetone, I use two mixing buckets for cleaning. I put about one quart of acetone in each bucket. Everything being cleaned goes into the "dirty" bucket first. After the tool is as clean as possible in the first bucket, it goes into the second. After a swish in the second bucket, the tools are laid out to dry. The roller should be taken apart before cleaning in the second bucket. When the buckets are not in use, keep them covered with plastic wrap and a rubber band.
Tools -
Latex gloves (I used the whole box of 50).
Vapor mask.
Gelcoat spray gun.
1" natural bristle brush.
3" natural bristle brush.
3/8" roller.
2-1/2 quart mixing bucket (I ended up using 8 of them).
Packing knife.
Blue masking tape.
Right angle grinder with carbide disk.
Rubber sanding block with 80 grit paper.
The total cost of the project, from plug to part, was about $400. Additional fenders will cost about $25 each in materials.
|
